
This technique is an attempt to find further applications for limp paper bindings in conservation 1The purpose of this technique is to include not only small, thin books that require only an adhesively attached case structure, but also "medium" size printed books that re quire supported sewing and mechanical cover attachment. The exact size, weight, shape, format, etc., indicated by the word "medium" must remain at the discretion of the book conservator. I have found this technique to function well with a book measuring 8-1/2" x 5-1/8" x 1-1/2" (using a Yapp foredge and ties).
Sewing is done over laminated vellum strips which are made in the following manner:
For each sewing support, two strips of strong but flexible vellum are cut--one 1/2" wide, the other 1/4" wide. They should be long enough to extend across the spine and about two-thirds the width of the book on both sides. An estimate must then be made of the final width of the spine
after sewing and spine formation. The width of each 1/2' strip is reduced to 1/4" for this same distance in the middle section of the strip (see Figure 1). Along the length of this reduced-width section the two strips are adhered together with PVA. The 1/2' strip must be on the outside and the 1/4" strip on the inside when sewn onto the book.
![]()
Figure 1. Outside vellum strip of sewing support.
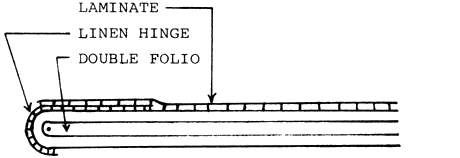
Endsheets must be designed with high mechanical strength, as they share the stress of both the sewing and the cover attachment--without being pasted down. Each endsheet is a double folio of strong handmade paper. A 1-1/2" hinge of unbleached linen is adhered to the outside of the inner folio, extending about 3/16" around the fold onto the inner leaf. A slightly heavier piece handmade paper (about cover weight) the same size as the folded endsheet is laminated to the outside of each endsheet. This should come right up to the fold (see Figure 2).

The sewing is most easily done without a frame. A concertina may be used, or, if preferable, loose guards of paper or thin flexible vellum may be included around the first and last signatures of the book. As the sewing nears completion, the reduced-width section of the 1/2" vellum strips may be extended if necessary. It is important that the reduced-width section does not extend past either edge of the spine.
After sewing, a reversible adhesive is used to glue up the spine. The endsheets are then trimmed. Next, a natural rounding and backing is gently induced. Any excess adhesive may then be removed with paste. After the book has dried in the press, endbands may be worked. Appropriate spine linings are then added, but they should not extend beyond the width of the spine.
The cover is then made separately according to the directions in the above-mentioned description by Gary Frost. The Yapp edge seems best for thicker books, and is compatible with foredge ties, which are described further on. The spine information may be added at this point by pen or stamping, or a label may be added after the cover is attached.

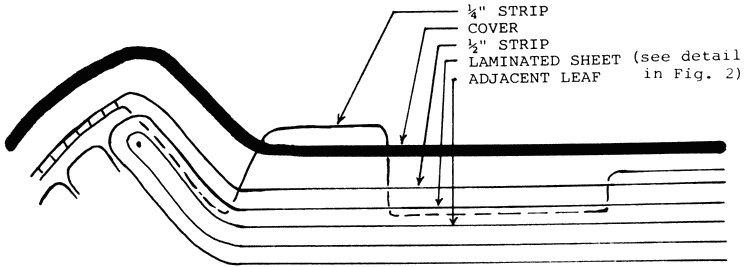
Figure 3. Cover attachment, section.
The final stage is cover attachment, which must be done with great nicety (as the English say). Quarter-inch slits are made through the outside fold of each endsheet corresponding to each vellum strip. The inside (quarter- inch) strips are drawn through these slits to lie between the laminated sheet and the adjacent leaf (see Figure 3).

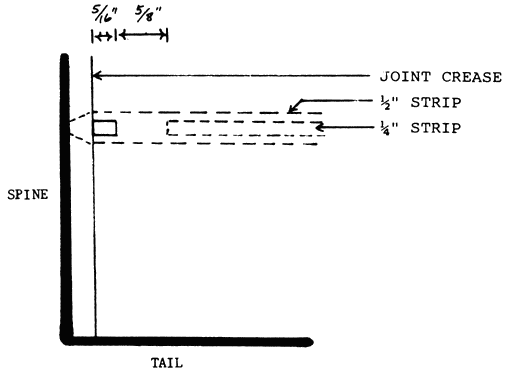
Figure 4. Cover attachment, top view (detail).
The paper cover is then positioned on the text block. A tin is placed under the laminated sheet, between the laminated sheet and the laced quarter-inch strips. With the cover in position, a quarter-inch chisel is used to punch a alit from the outside of the cover through the center of the half-inch strip and through the laminated sheet at the joint crease. The position of these slits is important, and can most easily be ascertained with a needle. The quarter-inch strips are then drawn snugly through these slits (see Figure 4). The tin is again inserted under the laminated sheet, and slits are punched again through the cover, the half-inch strips, and the laminated sheet at a short distance (approximately 5/16") beyond the first slits. The quarter-inch strips are laced back through these slits. The tin is placed between the cover and the half-inch strips. At a distance of about 5/8", further quarter-inch slits are punched from inside the laminated sheet through the half-inch strips only--not the cover. The quarter-inch strips again are pulled through the slits. PVA may be added under the strips at the points of lacing, but I have not found it necessary, as the interlocking vellum strips alone seem to provide an adequate attachment. Endsheets are not pasted down.
Foredge ties are best used with the Yapp edge, and may be added in the following way:
Four round pieces of vellum are cut out measuring about 1/2" in diameter. Four alum-tawed thongs are cut, each measuring at least 7" long. An awl is used to punch a hole in the center of each piece of vellum. Holes are punched through the cover about 1/4" in from the foredge to take the thongs, from the inside outside. A knot (which may be flattened with a hammer) is made at the end of each thong, which is drawn first through its vellum "button" and then through the hole in the cover, from the inside.
The laced limp paper binding has the advantages of the limp paper cased binding, with the added advantage for medium size books of supported sewing with mechanical cover attachment. The stress of the mechanical attachment is taken by the interlocking vellum strips, minimizing the wear of the paper components. It is particularly distinct from limp vellum binding in that its mechanical attachment begins at the joint crease, allowing the stress to be distributed to a greater area of the spine of the cover when the book is used.
1. Gary Frost, "The Limp Paper Cased Binding for Small Printed Books," Abbey Newsletter 3:1, 5-6, June 1979.