

Two methods for making wrappers with magnetic closures are described here. The closures have several advantages over the types now in common use, including ties, button, and Velcro snaps. Unlike ties or buttons, magnets produce no protruding parts on the cover or foreedge, and require no extra effort to close the wrapper. Unlike Velcro, magnets produce wrappers which open easily without gathering loose fibers or dust and grabbing onto clothing; they make the boards close flat, neatly and firmly; and they are strong enough to hold the wrappers closed, but are not easily torn off the wrapper.
There are several additional factors that make these closures appealing, both for aesthetic considerations in private work, and for institutional concerns for production and cost:
One potential problem which should be noted is that there is a possibility of the magnets affecting magnetic tapes if stored near them.
One supplier for magnetic strips is Adams Magnetic Products, 4547 W. Addison, Chicago, IL 60641 (312/286-6686). They have a catalog and a price list. They also have a minimum order of $25, for which you can get about 200 feet of the magnetic strips. (A thin strip of steel can also be used in place of one of the magnetic strips, though there may be more problems with cutting and attaching steel than rubber. Check local phone books for suppliers.)
Materials:
2-ply museum board
Thin cloth, such as Iris, Kennett, or van Heck
Permalife, or other acid-free paper for lining
Two 1/4" strips of magnetic rubber, 0.060" thick, the height of the museum board (Note: Check the correct polarity of the magnets before you start by making sure they stick to each other.)
Adhesive: PVA and methyl cellulose mix
Procedure:
1. Cut 6 pieces of museum board the height and width of the object. On two pieces, cut off 1/4" of the width.
2. Assemble Piece 1 of the wrapper as shown, using 3 full-sized boards. Leave about 5/8" turn-in of cloth all around. Trim off the corners of the cloth. Turn the cloth over the boards, and line the inside with paper. For small wrappers, the lining can be a single strip of paper. For larger ones, cover the joints with cloth, and use paper panels to cover the boards. (Giving each assembled piece a nip in a dry-mount press can make the job faster.)
3. Assemble Piece 2 as shown in Figure 2. Note that the first and third boards are the narrower size. Abut the magnets against the boards. Cover and line as for Piece 1
4. Glue the middle panel of Piece 1 on top of the middle panel of Piece 2. Close the wrapper and place under weights to dry.
Comment:
The magnetic attraction is not as strong in this type of wrapper as in Type B, but it is strong enough to hold under normal conditions. The flaps should be marked to show the order in which they are to be closed, since the magnets are not visible. Even with a thin object, this wrapper gives enough space on the spine to affix a label, if desired.
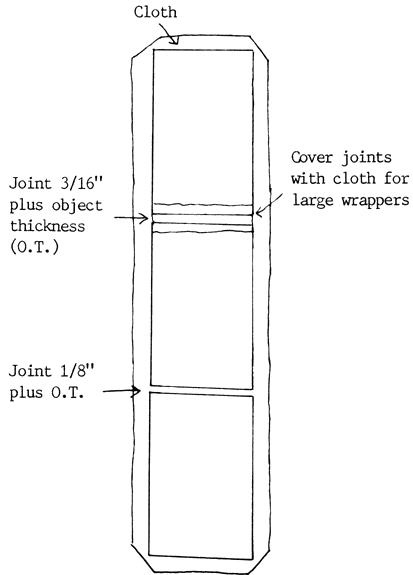
Figure 1. Piece 1, wrapper type A
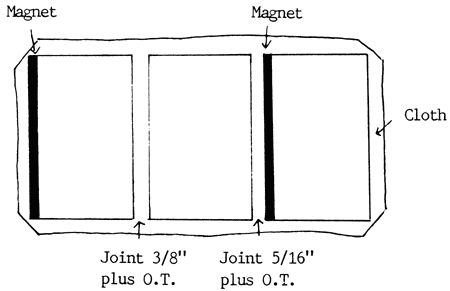
Figure 2. Piece 2, wrapper type A.
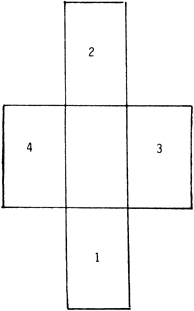
Figure 3. Order of closing of flaps, wrapper type A.
Materials:
10-point acid-free folder stock (The grain should run parallel to the direction of the folds on each piece.)
Binders' board
Cloth
1/4" strips of magnetic rubber, 0.060" thick (Note: Check the correct polarity of the magnets before you start by making sure they stick to each other.)
Adhesive: PVA
Wrapper:
1. Make Piece 1: Cut a piece of folder stock the width of the book and 3 times the height plus twice the spine thickness (Figure 4). Crease the folds with a bone folder. Fold Piece 1 around the book.
2. Make Piece 2: Cut a piece of folder stock the height of the wrapped book, and twice the width plus the spine thickness (Figure 5). Crease the folds with a bone folder. Fold Piece 2 around Piece 1, leaving the spine side open.

Figure 4. Piece 1, wrapper type B
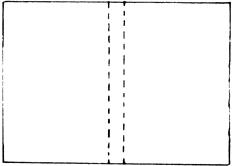
Figure 5. Piece 2, wrapper type B
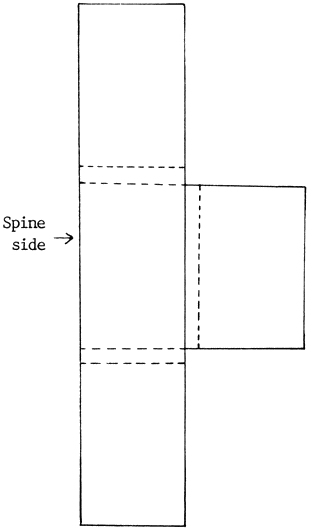
Figure 6. The assembled wrapper without case.
3. Glue Piece 1 on top of Piece 2 (Figure 6). Fold the wrapper around the book.
4. Cut two pieces of folder stock the height of the book in its completed wrapper, and the width of the book minus 1/4" (Pieces 3 and 4). Set them aside.
Case:
5. Cut two pieces of binders' board the height and width of the book in its wrapper, and one piece the same height and width of the spine of the book in its wrapper plus 1/8".
6. Cut a piece of cloth large enough to cover the case, with 5/8" turn-ins. Assemble the case as for the cover of a folding box, leaving 1½ board widths for the joints. Cover the inside spine area of the case with cloth.
7. Cut two strips of magnetic rubber the height of the wrapper.
Assembly of Wrapper and Case:
8. Glue the wrapper onto the righthand side of the case. Glue or tape one magnetic strip along the righthand folded edge of the closed wrapper and the other one along the left side of the case. Glue Piece 3 onto the board, abutting the magnetic strip; glue Piece 4 onto the wrapper, abutting the magnetic strip (Figure 7).
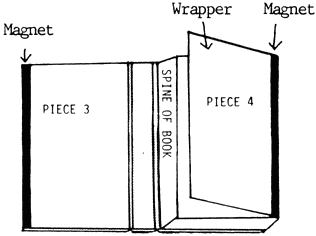
Figure 7. The assembled wrapper in its case. Piece 4 is laminated to the right flap of Piece 2. Piece 3 is laminated to the inside of the case.