TECHNICAL EXAMINATION OF RENAISSANCE MEDALS THE USE OF LAUE BACK REFLECTION X-RAY DIFFRACTION TO IDENTIFY ELECTROFORMED REPRODUCTIONSGlenn Wharton
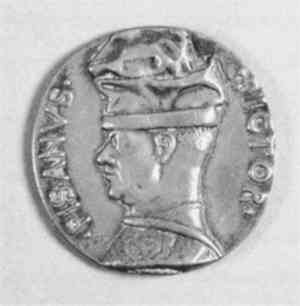
ABSTRACT—The history of medallic reproduction techniques is sketched, and means by which the techniques can be distinguished described. In particular, the identification of electroformed reproductions by Laue back reflection X-ray diffraction is investigated. 1 INTRODUCTIONTHE ART OF MEDALS is an art of multiples. From their origin in 1438 by Pisanello, Renaissance medals were usually produced in series, either cast in molds or struck from dies.1 Additional copies, called “surmoulages,” were made subsequently by casting in molds taken from the medals themselves. “Electroforming,” another technique of reproduction, was developed in the mid-nineteenth century following the discovery of the principles of electrochemistry.2 Since these various methods of fabrication are associated with individual artists, schools, and periods of history, identifying them provides evidence for authentication as well as establishment of historical chronology. Cast, struck, and electroformed medals can usually be distinguished by careful optical examination with the aid of low power magnification.3 There are times however when surface details may be misleading. For instance a cast reproduction of a struck medal may exhibit features of both techniques. Electroforming produces copies with such fidelity that often the most skilled eye cannot distinguish them from the original (Fig. 1). Clearly there is need for non-destructive techniques of analysis to supplement visual examination in distinguishing these methods of production.
The aim of this research was to examine the possible application of Laue back reflection X-ray diffraction to help meet this need. The apparatus employed was a flat-plate camera which produces photographic images of X-rays diffracted by the surface of the medal. Among other things, these photographs indicate the size of the grains within the metal microstructure. Since the grains of cast and struck metal are significantly larger than those of electroformed metal, this technique of X-ray diffraction seemed a likely tool to help identify electrotypes.4 Before discussing Laue back reflection X-ray diffraction in detail, a brief review of results obtained from visual examination and other methods of analysis will be presented. 2 DISTINGUISHING METHODS OF FABRICATION BY VISUAL EXAMINATIONTHE SURFACE OF a cast structure will frequently have small pits from air bubbles which were trapped as the metal solidified (Fig. 2a). Filing and chasing marks may appear where gates and vents were formerly attached, or where imperfections in the cast were reworked. Close examination may also reveal cast dendritic crystals on the surface which have preferentially corroded. Struck medals, on the other hand, can often be identified by sharp detail with no undercutting around the relief. At times they exhibit chatter marks from multiple strikes, and edge cracking from stress (Fig. 2b). Although a cast copy of a struck medal may reproduce these features, they are not usually as sharp as those on an original struck piece.
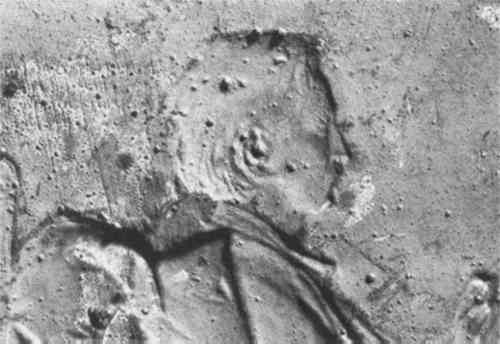
In composition, Renaissance medals are usually bronze or brass.5 After the fifteenth century, gold and silver came into use as well. Lead medals were also produced, often as trial proofs for final casts.6 Early electrotypes were always made in pure metal: most commonly copper, but also silver, nickel and even gold. Alloys were not used in the beginning because of the difficulty in preventing one metal from plating out preferentially to the other. All of the variables in the process, including bath composition, temperature, polarity around the electrodes, voltage, and current density had to be carefully monitored to obtain an alloy deposit. Yet by 1876 several patents had been taken out for the deposition of alloys, and it was becoming increasingly popular in industry.7 However, most art reproductions continued to be made in pure metal. The medals may have been patinated either with pigmented varnishes or by chemical treatment. The varnishes, which were most popular during the Renaissance, range from transparent to opaque. They consist of pigments suspended in binders such as linseed oil, sandarac gum, pitch, alum or wax.8 Chemical patination, popular If an electrotype was to remain one-sided, it was commonly filled with lead or lead/tin solder on the reverse to give it substantial weight. One-sided electrotypes which were not filled with lead can be identified on the reverse either by the exact negative of relief from the obverse or by their characteristic nodular texture (Fig. 3). These nodules grow as a result of uneven depositing on preferred sites called “active areas,” or “growth areas.” Once initiated, these protuberances attract more current than surrounding areas and grow at a faster rate.10
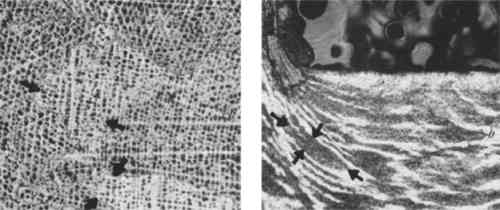
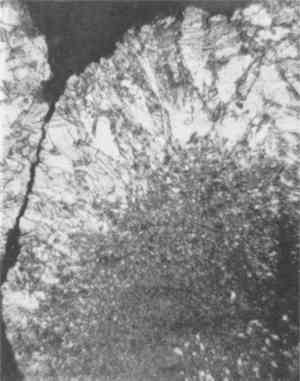
If two electrotypes were to be joined to create a two-sided medal, they were soldered together and the join was filed, chased, and patinated. Usually this join line is visible on close examination. If these characteristic features cannot be detected, other techniques of distinguishing medals may be utilized. 3 ANALYTICAL TECHNIQUES FOR DISTINGUISHING METHODS OF FABRICATIONMETHODS OF EXAMINATION other than visual include the measurement of dimensions, specific gravity measurement, radiography, X-ray fluorescence, scanning electron microscopy, and X-ray diffraction.11 Surmoulages, or reproductions cast from earlier medals, are smaller than their originals because of the shrinkage of cooling metal. The characteristic differences in microstructure of cast, struck and electroformed metal also make metallography an ideal, albeit destructive method of analysis. Although it has previously received little attention in the analysis of works of art, Laue back reflection X-ray diffraction offers a non-destructive method to obtain similar information on metal microstructure.12 Before discussing its application, it must be understood that the grains in electroformed metal are significantly smaller than those of cast and struck metal. The photomicrographs in Figure 4 illustrate the difference in size between typical cast, struck, and electroformed grains. Although the grain size will vary according to fabrication conditions, the grains of cast and struck metal will normally be much larger in scale.
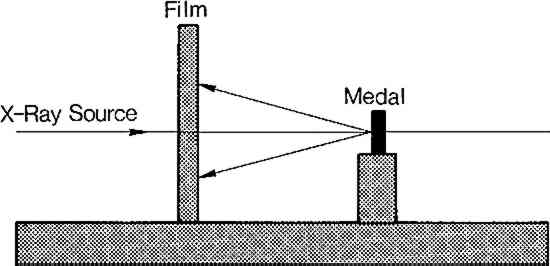
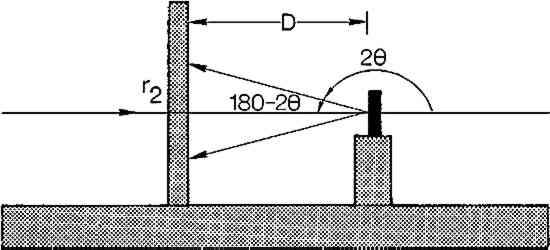
4 THE USE OF LAUE BACK REFLECTION X-RAY DIFFRACTION TO IDENTIFY ELECTROFORMED REPRODUCTIONSTHE LAUE METHOD of X-ray diffraction is commonly used to determine orientation within a single crystal.13 Normally a beam of “white” radiation is directed into the crystal which diffracts the X-rays onto a recording film. The pattern of spots which appear on the photograph indicates the crystallographic orientation of the specimen. Laue photographs can also provide information on the grain size and the actual composition of polycrystalline metal, although they are less commonly used for this purpose.14 In this study, a flat-plate camera was used with a collimated beam of monochromatic X-rays (nickel filtered copper Kα, 1.54�) in the back reflection mode.15 As depicted in Figure 5, the incident beam of X-rays passes through the center of the film to the medal surface, where it is diffracted back onto the film. The medals were placed three centimeters from the film, which was contained in a Land Diffraction Cassette. The exposure was a standard fifteen minutes at thirty-five kilovolts and fifteen milliamps. Other details of the experiment have been included as a footnote.16
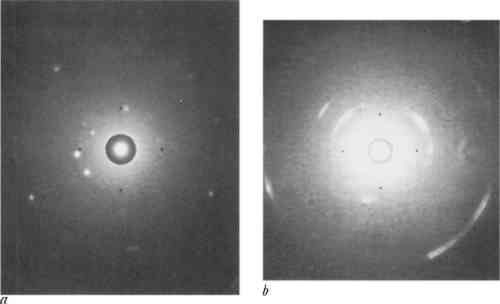
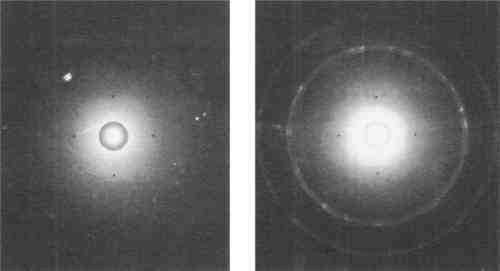
The number of spots which appear on the film corresponds to the number of grains which have diffracted X-rays. The number of grains which take part in this diffraction depends on their size, the diameter of the incident beam of X-rays, and its actual depth of penetration.17 This depth is often no more than about twenty-five micrometers, which in some cases represents only the surface layer of grains.18 As indicated in Figure 6, with a decrease in grain size, there is a corresponding decrease in size and increase in number of spots on the Laue photograph. When the grain size is relatively coarse, as in cast and struck medals, X-rays are diffracted in only a few directions, and the Laue photograph consists of several large spots. Grains in struck medals which have been deformed by blows from the die produce elongated Laue spots, as seen in Figure 6b. A fine grained electrotype will produce a photograph with many more and much smaller spots. These minute spots may be too small to be distinguished on the photograph. In this case they merge to form continuous “Debye ring” patterns (Fig. 6), which will be discussed in the final section.
During the course of this research it became evident that the grains in an electrotype are often smaller on the front surface than on the back surface. This phenomenon
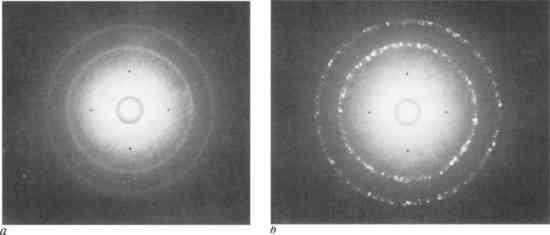
This variation in grain size will correspondingly produce different numbers of spots on Laue photographs. Figure 8a represents a typical Laue photograph from a copper electrotype, with a solid ring formation. However, the reverse of the same electrotype, where the grains were larger, yielded a somewhat spottier ring formation (Fig. 8b). Because of this difference in grain size, it is best to test the medals on the obverse whenever possible.
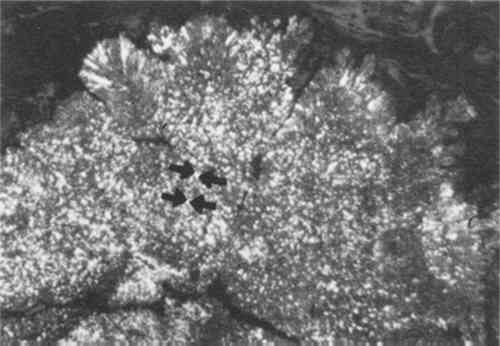
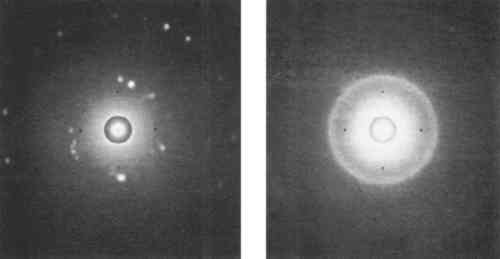
To better understand the effects that surface treatment has on Laue photographs, a variety of tests were performed on electroformed copper, and cast copper, silver and bronze medals. They were pickled, annealed, polished, sanded with six-hundred grit carborundum paper, and filed. Laue photographs were taken before and after these processes. The photographs from copper and bronze medals were only altered by filing. This harsh treatment distorted the grain boundaries, and a blurred but solid ring pattern was produced (Figs. 9a and 9b). The Laue photographs from the silver medals exhibited differences even after light sanding, since silver is a softer metal (Figs. 9c and 9d).
This study also showed that heat normally used in chemical patination or in soldering will not change the appearance of the Laue photographs. This is to be expected since the grain size of unstrained metal is not altered until the higher temperatures of secondary recrystallization of each metal is reached.19 Lightly polishing the surface will not affect the test results either. Yet if the medal has been chased, filed or in the case of silver, even lightly sanded, the patterns on the Laue photographs will be altered. Thus it is necessary to take readings from areas which have not been cold worked. It was also found that chemical patination affected the Laue photographs. To examine a medal beneath a patinated surface, it was necessary to remove the patina from an area about two millimeters in diameter. This is of course unfortunate, since the patina on most museum quality medals must remain intact. Often the patina is worn in areas of high relief however, which may expose enough of the metal surface to obtain a Laue photograph. 5 METAL IDENTIFICATION BY LAUE BACK REFLECTION X-RAY DIFFRACTIONTHE CIRCULAR PATTERNS of spots on Laue photographs are called “Debye rings.” They are produced by the diffraction of X-rays from the crystal lattice of the specimen as determined by Bragg's law. The angles of diffraction and the size of the resulting Debye rings are characteristic of the metal being examined. The specific metal can therefore be identified by determining these angles of diffraction (which are given the symbol θ.) The following discussion on how to identify the metal has been simplified θ for each Debye ring may be calculated by determining the tangent for the angle 180–2θ using the following equation. The symbols θ, r2, and D are defined in Figure 10. After solving for θ for each
Table 1. Copper X-ray powder data for copper Kα radiation. I represents the intensity of the diffracted beam, θ, the angle of diffraction, and d, the spacing of the crystal lattice. (From the Peacock Atlas of X-ray Powder Data for Ore Minerals.)
6 CONCLUSIONTHESE INITIAL RESULTS demonstrate the potential use of Laue back reflection X-ray diffraction in identifying electroformed microstructure. A further study comparing Laue patterns from cast and struck medals with reference to crystallographic orientation and grain deformation should help distinguish these methods of fabrication as well. With the current research at the Center for Conservation and Technical Studies at the Fogg Art Museum and the Technical Laboratory at the Freer Gallery of Art, this technique will no doubt find broader acceptance to the study of metallic works of art. ACKNOWLEDGEMENTSTHIS RESEARCH WAS undertaken at the Center for Conservation and Technical Studies at the Fogg Art Museum, and supported by a grant from the National Museum Act. I would like to express gratitude to Eugene Farrell, Senior Conservation Scientist, and Arthur Beale, Director, of the Center for Conservation and Technical Studies for their continuous help with this project. Additional information was provided by Merton Fleming, Chairman of the Department of Material Science and Engineering of the Massachusetts Institute of Technology, and Lambertus van Zelst, Director, and Joan Mishara, Conservation Scientist, of the Conservation Analytical Laboratory of the Smithsonian Institution. I am grateful to David Farmer, Director of the University Museum at the University of California, Santa Barbara, for providing me the opportunity to examine the medals and plaquettes of the Sigmund Morgenroth Collection. I would also like to thank John Gebhart, Conservation Photographer of the Conservation Center at the Los Angeles County Museum of Art, for reproducing the photographs included in this article. REFERENCESFor information on casting and striking processes, see: Beale, Arthur. “A Technical View of Nineteenth Century Sculpture,” Metamorphoses in Nineteenth Century Sculpture. JeanneWasserman. (Harvard University Press, Cambridge Ma. 1975.) pp. 29–54. Cellini, Benvenuto. trans. Ashbee, C.R.The Treatises of Benvenuto Cellini. (Dover Publications, Inc., N.Y., 1967.) pp. 67–69, 112–126. Cennini, Cennino D'Andrea. trans. Thompson, Daniel V., Jr.The Craftsman's Handbook. (Dover Publications, Inc., N.Y., 1960.) p. 130. Hill, George. Medals of the Renaissance. revised by Pollard, Graham. (British Museum Publications, Ltd., 1978.) pp. 23, 27, 29–30. Jones, Mark. The Art of the Medal. (British Museum, London, 1979.) 177 PP. Maryon, Herbert. Metalwork and Enameling. (Dover Publications, Inc.N.Y., 1971) pp. 200–227. Middledorf, Ulrich, and Goetz, Oswald. Medals and Plaquettes from the Sigmund Morgenroth Collection. (The Art Institute of Chicago, Chicago, 1944.) pp. xi–xiv, 3–60. Tuttle, Patricia. “An Investigation of Renaissance Casting Techniques of Incuse-Reverse and Double Sided Medals” (Upcoming publication of the “Italian Medals Symposium,” sponsored by the Center for Advanced Study in the Visual Arts, National Gallery of Art, Washington, D.C. March 29–30, 1984.) Untracht, Oppi, Metal Techniques for Craftsmen. (Doubleday and Co., Inc., Garden City, N.Y., 1975.) pp. 341–378. Vasari, Giorio. trans. Louisa S.Maclehose. Vasari on Technique. (J. M. Dent & Co., London, 1907.) pp. 161–166, 199–202. Weiss, Roberto. Pisanello's Medallion of the Emperor John VIII Paleologus. (University Press, Oxford, 1966.)32 pp.
For more information electroforming processes, see: Bart, S.G.“Historical Reflections on Electroforming.” Symposium on Electroforming — Applications, Uses, and Properties of Electroformed Metals. The American Society for Testing Materials, Special Publications Number 318. (A.S.T.M. Philadelphia, 1962.) p. 172.
Bouant, Emile. La Galvanoplastie: Le Nickelage, La Dorure, L'Argenture, et L'Electrometallurgie. (Librarie J.B. Bailli�re et Fils, Paris, 1887.) (M.I.T. Archives.) pp. 71–141.
Illustrated London News. 42. “Memorial of the Great Exhibition of 1851.” (June 17, 1863.) (M.I.T.) p. 696. Beale, Arthur. “Surface Characteristics of Renaissance Medals and Their Interpretation.” (Upcoming publication of the “Italian Medals Symposium,” sponsored by the Center for Advanced Study in the Visual Arts, National Gallery of Art, Washington, D.C. March 29–30, 1984.) This initial assumption was supported in private communication with Professor Merton Fleming, Chairman of the Department of Material Science and Engineering, Massachusetts Institute of Technology, June 29, 1982. Unfortunately, all copper alloy medals are usually described as “bronze” in the literature. Recent X-ray fluorescence analysis performed at the Center for Conservation and Technical Studies at the Fogg Art Museum indicates that Renaissance medals are actually composed of a wide range of alloys, including bronze, brass, latten (copper, tin, zinc, and lead), lead/tin, and pewter. Farrell, Eugene. “Non-Destructive Instrumental Analysis of Medals” (Upcoming publication of the “Italian Medals Symposium,” sponsored by the Center for Advanced Study in the Visual Arts, National Gallery of Art, Washington, D.C. March 29–30, 1984.) Hill, George. op. cit. pp. 30, 32. Weiss, Roberto. op. cit. pp. 9–10. Napier, James. op. cit. (Second edition.) p. 186. Cellini, Benvenuto. op. cit. pp. 98–102. Hill, George. op. cit. pp. 33–34. Untracht, Oppi. op. cit. pp. 415–419. Vasari, Georgio. op. cit. pp. 166. Raub, E. and Muller, K.op. cit. pp. 65–72. Farrell, Eugene. op. cit. The application of this technique to works of art was first described by Young, William. J. “Examination of Works of Art Embracing the Various Fields of Science.” Application of Science in Examination of Works of Art. (Museum of Fine Arts, Boston, 1959.) pp. 26, 30. Cullity, B.D.Elements of X-Ray Diffraction. (Addison-Wesley Publishing Co., Inc., Reading, Ma., 1978.) pp. 296, 233–247. Quinn, T.F.J.X-Rays, Electrons, and Crystalline Materials. (Butterworth & Co., London. 1970.) pp. 61–67. Cullity, B.D.op. cit. pp. 153, 281–292. Taylor, A.. X-Ray Metallography. (John Wiles & Sons, Inc., N.Y.1961.) pp. 665–666.
The use of this technique is described in: Quinn, T.F.J.op. cit. pp. 71–73. Polaroid Land Rapid Process Film was used in this experiment. The film holder was a Polaroid XR-7 Land Diffraction Cassette, purchased from Blake Industries, 600 Scotch Plains Rd., Jerusalem Plains, N.J. 07076. This flat-plate camera contains an intensifying screen to convert X-rays into visible light which in turn exposes the film. An aluminum holder for the medals was specially designed with an adjustable support. This allowed exact positioning of the medal where the beam was to strike the surface. Cullity, B.D.op. cit. p. 282. Cullity, B.D.Ibid. pp. 292–293. Bailey, A.R.A Text-Book of Metallurgy. (Macmillan, London, 1960.) p. 115B. Guy, Albert G., Elements of Physical Metallurgy. (Addison-Wesley Publishing Co., Inc., Reading, Ma., 1959.) 436. Berry, L.G. and Thompson, R.M.X-Ray Powder Data for Ore Minerals: The Peacock Atlas. (Waverly Press, N.Y.1962) p. 11.
 Section Index Section Index |
